Friday 28 June 2019

Row Level Formulas- Summerʻ19 Feature

With this release, we get an option to create row level formulas (Beta) in Lightning reports. Sometimes, we want to show some calculated data in reports which is possible with the help of formulas. Currently, we can create maximum 1 row level formula in reports.

First, you need to enable setting.

Setup-> Reports & Dashboard Settings-> Select checkbox for Enable Row-Level Formulas (Lightning Experience Only)


Now, its time to add formula in report. My requirement is as follows:-

I want to see number of days left in closing opportunity. If opportunity already closed or close date was in past then i will show zero in formula. I will modify existing opportunity report to add formula.

Go to the column panel and click on "Add row level formula Beta".


Add formula as shown in below image.


Click on Run button. You will see output. In below report, we can see number of opportunities by each rep and days left in closing the opportunity.


Step by step information to setup row level formula can be watched from this video.

Reference URL -
https://admin.salesforce.com/get-buildspiration-with-summer-19-row-level-formulas
https://releasenotes.docs.salesforce.com/en-us/summer19/release-notes/rn_rd_reports_row_level_formulas.htm

Wednesday 19 June 2019

In-App Guidance - Summerʻ19 feature

We can create in-app guidance in salesforce to engage with our users, to give training to them. We can create action buttons to navigate  them to important URLs. We can specify audience and duration.

You can add up to 500 prompts per org. This limit doesn’t include prompts installed from packages. You can add multiple prompts to the same page, but multiple prompts don’t appear at once.

In this example, we will setup in-app guidance for our users to train them on Custom notification. We will setup prompt on homepage in Salesforce org to navigate them to my blog post.

Steps to configure in-app guidance are below:-

1. Go to setup -> quick search ->search for in-app guidance.


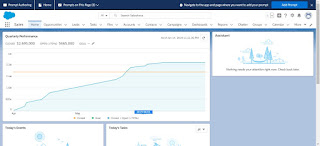
2. Click on Add prompt. You will see Open Prompt Authoring Bar screen. You can create and edit prompt using this screen.
3. Navigate to the Application and then tab where you want to display prompt. Click on Add Prompt.


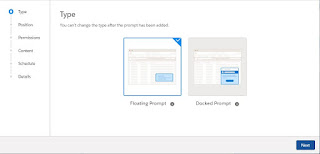
4. You can select the prompt type either Floating or Docked. We will select Floating here.
5. Click on next to select position. We can select location as top or bottom left, center, right.

6.  We can setup permissions to give access to everyone or to users with specific permissions can view it.


7. From the content tab, enter title and body. You can add buttons.

Choose to have an informational prompt with a dismiss button only or add a specific call to action. The dismiss button closes the prompt. The optional action button opens a URL. Add Action button, if you want to navigate to external URL.

8. We can Choose a date range for the prompt to appear. Then, decide if the prompt should appear once or repeat.
9. Enter the details of the prompt. 
10. Navigate to Application and click on Home tab. You will find prompt with custom notification. Click on custom button Learn. It will navigate to blog link.


Click on open button. It will open blog post. Your users/reps can learn about custom notifications from there.

Please follow video with step by step information to configure.

Reference link:- 

Tuesday 18 June 2019

Custom Notification - Summerʻ19 Feature

We can send custom notification whenever any important event occurs. Example, you can notify Account owner to followup with client whenever any opportunity closes or you can notify sales manager when opportunity wins.

Previously, you could send only standard notifications for use cases predefined by Salesforce. Notification Builder puts you in control of who needs to know what and when.

Step 1 ) First we will setup Notification. To do so follow below steps:-

Setup -> quick search -> search for Notification Builder -> Click on Notification types.

Enter Custom Notification Name and supported channels. Refer below screenshots.


Step 2) Create new process using process builder to send notification.


 Process Name :- Notify Account Manager whenever opportunity wins
Object - Opportunity
Start the process - when a record is created or edited
Set condition as Opportunity stage = closed won.


Step 3 ) Select Action type as Send Custom Notification
Action Name - Notify Account Owner
Notification Type - Notify Account Manager whenever Opportunity wins.
Notification recipient -> Recipient could be User, Owner, Group, Queue and Account team.
In this example we will select Account owner.

Enter Notification Title and Body.

Save the process and Activate it.

Step 4) Navigate to Sales Application -> Close opportunity.

Login as Account owner. Click on Notifications next to setup link on available on right top of screen. You can see custom notifications.

Please follow my video to get step by step information. 

Reference link:- 1) https://admin.salesforce.com/get-buildspiration-with-summer-19-notification-builder
2) https://releasenotes.docs.salesforce.com/en-us/summer19/release-notes/rn_mobile_s1_newfeat_notification_builder.htm

Monday 17 June 2019

Related List Filter - Summerʻ19 Feature

Summerʻ19 comes up with lots of new feature. We can put quick filter on Related list. Use quick filters in your related lists to find the data that you’re looking for. Related list quick filters are different from regular list view filters in that they aren’t saved, persist only throughout your current session, and can’t be shared.
First step is to enable Enhanced Profile User Interface. Follow steps mentioned at link to enable it.
Its time to test quick filter on Related List. Go to App Launcher -> Navigate Sales Application.

Open any account and click on Opportunities related list and click on View All.

Click on filter link. You can put filter on all the fields specified in list view and click on Apply button and you will get required result.

Please find step by step information in below video to use quick filter in Related List.

Related List quick Filter

Sunday 16 June 2019

Enhanced Related List

Summerʻ19 comes up with many new features including Enhanced Related List. 

With Enhanced Related Lists, you can show up to 10 columns, resize and sort your columns, perform mass actions, and wrap text.

We can display maximum 10 fields on related list record. Default ordering is by RecordID. We can sort by any number of field on the object level.

To modify page layout, follow below path:-
Setup-> Object Manager -> Click on object -> page layouts. Click on edit link. 
Go to related list and click on wrench icon and select 10 fields which you want to display. 


Select the field name in sort by column.


To display more than four fields in Lightning Experience, edit the related list component in the Lightning App Builder and choose Enhanced List as the related list type. Follow below steps:-

Open Account record -> Click on edit page from setup.
Go to related list section and select Related list type as Enhanced List. We can specify number of field to be displayed. Maximum number is 10.


Open Account record and on opportunity related list, you can see 10 fields.


Wrap/Clip Text

Go to related list tab and navigate to object whose text you want to wrap. 
Below Video contains step by step information to configure enhanced related list.

Reference link:-


Thursday 13 June 2019

Celebrate Sales Success using Path

Path

We can celebrate success in Salesforce using path. Now, your reps can have fun along with work.

Path is only available in Lightning.


Path is available for the following objects in Lightning Experience:

  • Accounts (Business Accounts and Person Accounts)
  • Campaigns
  • Cases
  • Contacts
  • Contracts
  • Leads
  • Opportunities
  • Orders
  • Quotes
  • Service Appointments
  • Work Orders
  • Work Order Line Items
  • Custom Objects


Path is also available for leads and opportunities in all versions of the Salesforce app.

Enable path:-

Go to setup -> search Path Settings in quick find. Select Enable Path checkbox.
Click on New Path and select object and Recordtype for which you want to setup Path.


From the picklist option, you can select any available picklist field for that object.

Here we are creating path for Opportunity object and Stage picklist. 

In Step2 , you can Select Fields and Provide Guidance for Each Step in the Path


In Step3, Set status as Active. Select option B.

Activate your path. If you aren’t ready to make this path available now, you can still save it and activate it later.


Select Confetti to celebrate particular status. To do so select option A.

A. When users reach a specific step in the path, help them celebrate their success with on-screen confetti. Here we are selecting status as Closed Won. 


After setting up path, create opportunity and update stage to Closed won.

You will see celebration on desktop.

Video link is below:-
https://youtu.be/jck2t2TpEbY