Friday 24 February 2017

Salesforce DX

 Salesforce DX provides you with an integrated, end-to-end lifecycle designed for high-performance agile development.  We can export metadata, define data import files, and easily specify the edition, features, and configuration options of your development, staging, and production environments.

It enable source-driven development of code, team collaboration with governance, seamless promotion of code from development to production, continuous integration with automated testing, and support for third party developer tools in the application lifecycle.

Salesforce DX defines an entirely new way to manage and develop Salesforce apps across their entire lifecycle to enable new levels of agility:
  • Shifting the source of truth from the Salesforce org to version control.
  • Focusing on source-driven development to facilitate team collaboration and continuous delivery (CD).
  • Consolidating Salesforce developer and DevOps capabilities into a single command-line interface (CLI).
  • Providing scratch orgs as ephemeral, configurable, and disposable environments, built from source, for development and continuous integration (CI).
  • Prioritizing the use of industry standard tools and processes.
  • Re-imagining our packaging technology to manage the encapsulation and deployment of metadata and code.
  • And dozens of other things to support these efforts and more.
The Salesforce DX command-line interface (CLI) is built on the Heroku CLI, and provides a way for developers to take advantage of all salesforce APIs. In the past, these capabilities lived across a number of different tools (e.g. Salesforce workbench, Force.com CLI, and more).

The CLI becomes the principal way in which developers will interact with the Salesforce org. You can use it to create scratch orgs, push and pull source and metadata into the org, and even perform operations that affect metadata in the org — for example, assigning a permissions set for an app or executing anonymous Apex.

The CLI also provides ways to make DevOps easier with Salesforce. You can use the CLI as part of build automation scripts, creating environments from source and running all of your tests.


Key Features

  • Scratch Orgs – Currently, Salesforce developers use Developer Editions or Developer Sandbox for development and testing. Automation suites for CI will create scratch orgs as needed. When the task is complete—whether it’s a new feature, or a CI job—the scratch org can be deleted. If it’s not explicitly deleted, it will get marked for deletion and removed in a scheduled fashion. This is a significant change, and broad usage will help affirm our thoughts around the scratch org lifecycle.
  • Version control system - The new scratch org makes it easier for developers to build their apps and automate continuous integration and delivery, all from the CLI. The scratch org allows developers to develop using local source, run all their tests, and deliver confidence before they commit back into VCS. Once updates are back in VCS, developers will be able to use standard web hooks to initiate build automation and continuous integration (CI), whether it's the Salesforce solution using Heroku Pipelines or a 3rd party tool like Jenkins or TeamCity. 
  • Developer Tools - Salesforce DX includes an updated Eclipse integrated development environment (IDE) that significantly expands the value of the toolset to developers.
  • Integration with Existing Process –  Incorporate Salesforce DX into your existing CI and CD systems. This could include Jenkins or TeamCity, but may also include Heroku Flow or a home-grown solution.
  • Environment Hub -Environment Hub allows you to track all of the orgs you use. When Environment Hub is enabled in an org, it establishes that org as a central management point for other orgs. Users in that org can be granted permissions to create, delete, and manage orgs. Licenses for development, and testing orgs are linked to Environment Hub.
  • New APIs - With the help of new APIS we can use features Environment Hub and Scratch Orgs. We can  integrate these new features into your workflows.


For more information refer URL - https://developer.salesforce.com/platform/dx


Monday 20 February 2017

Salesforce Health Check

Health Check lets you understand and proactively remediate your org’s security risks and vulnerabilities from a single page. A summary score shows how your org measures against the Salesforce recommended baseline. This feature is available in both Lightning Experience and Salesforce Classic.

We can see and fix security risks for Session Settings, Password Policies, and Network Access settings.


From Setup, enter Health Check in the Quick Find box, then select Health Check.


For my developer sandbox, security health check is 73%(refer above screenshot). 

The Salesforce Baseline standard contains recommended values for the Session Settings, Password Policies, and Network Access setting groups. 

From this page we can see which settings have High Risk and Medium risk. Which settings meets standard. All of your settings that meet the standard are listed at the bottom in Meets Standard Security Settings section.

In my sandbox, Maximum invalid login attempts have high risk. Standard value for this setting is 3 however, my value is 10. I need to update this value so that this setting should meet criteria.

To fix risk, click on FIX Risk button available on top. Select the checkbox for all the settings which you want to update then click on change settings. The values for these settings will be updated with standard salesforce values.


You can only use Fix Risks to change the Login Access Policies, Password Policies, and Session Settings groups. Because all other settings in Health Check (like Network Access) are configured to match org-specific business requirements, you must change them manually using the Edit link on the Health Check page.

How Is the Health Check Score Calculated?
The Health Check score is calculated by a proprietary formula that measures how well your security settings meet the Salesforce Baseline standard. Settings that meet or exceed the standard raise your score, and settings at risk lower your score.

Saturday 18 February 2017

Quip Connect : Quip + Salesforce integration

Quip is the next-generation productivity suite that combines documents, spreadsheets, task lists, and team chat in one seamless experience known as a living document. Quip is 100% cloud based, and built for both your desktop and mobile device so you can work with your team the way you want to.


Quip is built to help every team in your business — sales, service, marketing, product, IT, and more — work smarter, collaborate more effectively, and increase their productivity. With Quip Connect, you can open Salesforce reports in Quip with Live Data. You can also search, access, and share Quip content right inside Salesforce. 
 
Salesforce has launched an AppExchange package called Quip Connect for Salesforce
so users can export reports from Salesforce’s Sales and Service Cloud and even open up Quip-powered documents natively within the CRM.

This tool is free. You can download it from App exchange. Once installed, we can see package from installed packages.


We can create quip account from https://quip.com


 With Quip Connect, you can open Salesforce reports in Quip with Live Data. You can also search, access, and share Quip content right inside Salesforce.  

Set up Quip Connect with Lighting

  1.  In an Account page, click the gear (upper right) and then click “Edit Page.” 
  2. Next select the right-most rectangle (containing Activity and Chatter tabs). Then click on the tabs themselves (Activity & Chatter).
  3. Add the custom tab called “Quip Documents.”


 4. Search for Quip in the “Lightning Components” search (to the left of the page).

5. Drag the Quip component into the “Quip Documents” tab you created in Step 3.
6. Click “Save” in the upper right-hand corner. Then click “Back,” also in the upper right-hand corner.

Set up Quip Connect with Salesforce Classic

Go to Account ->page layout->click edit button.
 Add new section and drag quip_comp_accounts from visalforce page.


To open a salesforce report in Quip

click open reports in quip tab and select report. Click on Open in Quip button. 


Use the “Live Data” button to change data settings, open the report in Salesforce or view the report owner. 
We can do formatting of the extracted report from Format tab. From insert tab we can insert row/column.

To link quip documents to Accounts, opportunities, or contact. Open account then go to Quip Documents section. Search document created in quip and click on link.


Please find Quip Connect documents from App Exchange


Thursday 16 February 2017

Salesforce Agile Accelerator Manage Your Agile Development from Salesforce

Salesforce Agile Accelerator helps manage your agile product development in salesforce.   Agile Accelerator consolidates scrum, QA, and bug tracking into a single, interface, called GUS (Grand Unified System).  With the help of sprints we can organize our work into manageable chunks.
Salesforce Agile Accelerator, a new Salesforce Labs app, development teams can:
  • Track business requirements, measure progress, and successfully deliver releases – right from Salesforce.
  • Use drag and drop tools to manage backlogs, sprints, and user stories.
  • Collaborate with cross-functional teams through Chatter, linking actual business needs to development efforts.

Agile Accelerator is free app exchange product. We can download it from following url:-


We can install it in the developer sand box. Once it get installed , we can check it from following:-
Setup -> Build -> Develop -> Installed Packages


Create Product Tags

From Product Tag tab click on New Product Tag and enter tag name. 


Click on Create new button to create new user story or bug.


Create Sprint

Click on sprint tab and click new. Enter the name of the agile team that you created earlier in the Agile Team field. Populate the Start Date and End Date fields.Click Save button.


Salesforce Epic

An Epic is a large User Story that can’t be completed in a single sprint or sometimes even multiple sprints. Because Epics are large projects, Agile teams break them down into smaller, manageable User Stories.

To create new EPIC, click on new button and enter below details:-

Epic Name
Description
Design Lead
Development Lead
Quality Lead
Team
Design Complete
Tech Design Complete
Test Design Complete


Work

  • Click the Sprint tab and then New Work. 
  • From Record Type, select User Story then click continue. 
  • Other choices are bugs and investigations. 
  • A description of each record type is shown at the bottom of the page.

Task


From your sprint, click the drop-down arrow within a user story and then select Add task


Backlog Manager

From  backlog manager, we can manage all team's work.
  • Click the Backlog Manager tab. 
  • You are shown two panels by default: your team’s backlog and backburner. 
  • The backlog is for user stories that your team has prioritized to work on in a sprint. 
  • The backburner represents open user stories that haven’t been prioritized by your team. 
  • Drag the user story that you just created from the backburner to the backlog.
  • Open a new panel by clicking the Add Panel link in the top left corner. 
  • Select By Sprint.
  •  Enter the name of the sprint that you created in a prior step. A panel opens that contains only work records for that sprint


Sunday 12 February 2017

Salesforce CPQ - Quote-to-Cash and CPQ Software

CPQ stands for configure, price, and quote. Salesforce CPQ is Web-based CPQ Software (Configure Price Quote), billing software, and invoicing software that reduces errors, accelerates sales deals, and streamlines invoicing and subscription billing processes with easy-to-use software in the cloud that works on any device. 

Salesforce CPQ uses information pulled directly from the Opportunity record to build a quote. This includes Account, Contact, and deal information. It also includes the date when a deal will be closed.

With Salesforce CPQ, sales team can create quotes quickly, with minimal effort and minimal error. 

Key elemnets of CPQ

Configure

Salesforce CPQ uses smart rules to make sure you and your reps sell related products together [1] and to prevent incompatible products from ending up on the same quote.


Price

You have to decide product price and discount you are offering. Rest all is done by CPQ. Advanced pricing options include volume discounts, percent-of-total subscriptions, pre-negotiated contract pricing, and channel and partner pricing.


Quote

You can generate a PDF with all quote details and send it to your customer with just one click. The quote is dynamic too, so if your quote requires special terms, they appear automatically. Add e-signature integration, and you’ll be closing deals faster than ever.
We can generate quote using out-of-the box Salesforce CPQ functionality. Quote contains below information:-

  • It is a document that contains information about the products and services which we sell to our customer.
  • It contains contact information of customer and our company
  • A table of prices adding up to a grand total, dates and signatures.
Quote document is stored on opportunity and quote so anyone who have access of opportunity and quote can see it.

Choose right Product


Salesforce CPQ  help by leading you through a guided selling process. When you answer a series of questions, you get a list of suggested products that fit the bill. The guided selling process begins when you start adding products to a quote. Your answers to the guide questions determine which products Salesforce CPQ suggests.


Once opportunity/Quote is closed/won then we create contract for the subscribed product. When contract will end, and then we create opportunity to create a quote for a renewal sale. Salesforce CPQ automates this entire process so creating contracts and quoting renewals is seamless for you and your sales team.

Salesforce CPQ uses the standard Salesforce Contract object, which is associated with customer’s account. On your opportunity, there is a Salesforce CPQ field, “Contracted”, that triggers the contract and renewal cycle.


At the end of a successful sale, mark the Opportunity as Closed/Won. Your Salesforce admin can create a workflow rule to kick off an automated process that marks the Opportunity as Contracted and creates a Contract on your customer’s Account. The contract includes subscription records for any subscription-based products and keeps track of what products need to be renewed later on.

Once you have a contract with your customer, Salesforce CPQ can easily handle updates to products included on that contract with an amendment. All the business logic you used during the original product selection also applies when you add or remove products from the contract. When you amend your customer’s contract, Salesforce CPQ creates a new quote and opportunity. On your new quote, the subscription products are priced according to how much time is left on the contract.

Salesforce CPQ can automatically create renewal opportunities and quotes for subscription products before your customer’s contract ends. 

Salesforce Trailhead URL 

https://trailhead.salesforce.com/modules/sf_cpq

Please contact salesforce for pricing information


https://www.salesforce.com/editions-pricing/salesforce-quote-to-cash/

Saturday 11 February 2017

Salesforce Agile Methodology


Waterfall is a structured software development methodology, and often times can be quite rigid, whereas the Agile methodology is known for its flexibility. If you want to use the Waterfall model for software development, then you have to be clear with all the development requirements beforehand as there is no scope of changing the requirements once the project development starts. The Agile methodology, on the other hand, is quite flexible, and allows for changes to be made in the project development requirements even after the initial planning has been completed.

Agile methodologies propose an incremental and iterative approach to software design. In Agile, product is developed in small incremental builds. These builds are also called as sprints. The life time of each sprints is about one to three weeks. In each sprint cross functional teams works simultaneously on various areas like planning, requirements analysis, design, coding and testing. At the end of each iteration a demo product is made available to the customer or stake holder for sign-off.


Scrum, a project management framework that promotes short cycles, iteration, learning, and team improvement, as well as getting and measuring feedback to ship the next increment of a product.

Agile Methodology has following advantages:-

Testing

At the end of sprint, testing is done which make sure that all bugs are caught and fixed. Running product can be launched to end users at the end of each cycle.

Flexibility

Agile allows the freedom to make changes as necessary. After every sprint, the team re-evaluates the direction of the project and adapts accordingly. With other methodologies, project managers are bound to what is in the design document that was approved in the very initial stage of the project. At the end of sprint, client can add their feedback so that they ultimately get the product they desire.


Issue Identification

Issues can be uncover early. Iterative testing and integration is done throughout the entire cycle of the project so the development team is able to address issues with each release and adapt to change, when necessary.


Schedule & Cost

Each sprint has fixed duration and scope. There is a clearer understanding of the cost of the entire project as well as the timeline for its delivery. Client evaluates cost estimation for each sprint and they can take decisions and prioritize features which needs to be done early.


Communication

Timely calls with Client. Client review project progress and give feedback. Those feedback can be implemented so that end user does not have wrong product at the end.


Salesforce Agile Accelerator

 With the help of salesforce agile accelerator we can implement agile in Salesforce. 

Saturday 4 February 2017

Salesforce Einstein features

Salesforce Einstein is the first comprehensive AI for CRM. Einstein enables you to become
an AI-first company so you can get smarter and more predictive about your customers. 
Before jumping into Salesforce Einstein, we will find out what is artificial intelligence?

  • AI makes our lives easier with personalized recommendations, intelligent search results, and automated assistants (but not killer robots)
  • AI is at an evolutionary tipping point with the convergence of data, computing power, and algorithms
  • AI is embedded in the applications that we already use in our consumer lives and is surfaced inherently through the UI experience


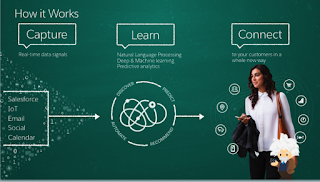
How Salesforce Einstein works?

 salesforce einstin


Sales Cloud Einstein 
Guide sales reps to the best leads and opportunities so they can focus on closing the right deals. Sales Reps get an automatic reminder task to follow up with customers who haven’t responded to emails. They can review the reminder tasks, and accept or reject tasks on demand. When you purchase Sales Cloud Einstein, Salesforce installs two packages in your org, SalesforceIQ Cloud and Sales Insights. Each package adds an associated integration user and profile. 

Set Up Sales Cloud Einstein

  1.  From Setup, enter Setup Assistant in the Quick Find box, then select Setup Assistant under Sales Cloud Einstein.
  2. Select who can use Einstein.

    • Create a permission set.
    • From the License drop-down list, select Sales Cloud Einstein.


    • Click Save.
    • Click App Permissions.
    • Enable app permissions for Einstein features.
    • Assign the permission set to users.

    • From the Einstein Setup Assistant, enable these Einstein permissions.

4. Using the Lightning App Builder, add the Einstein component to the Home page and to Lightning pages for accounts, leads, and opportunities.

Einstein Features

Automated Activity Capture - After setting up Einstein, Salesforce asks Einstein users to connect their Google™ or Microsoft® Office 365® account to Salesforce. Then, on accounts, contacts, leads, opportunities, and person accounts, they see their related emails and events. They also see related emails and events from others on their team.

Prioritize Your Leads with Predictive Lead Scoring and Lead Insights -  This feature is new in both Lightning Experience and Salesforce Classic. Einstein Lead Insights uses a combination of data science and machine learning to discover the patterns of lead conversion in your business, and predict which leads to prioritize. By using machine learning, Lead Insights provides a simpler, faster, and more accurate solution than traditional rules-based lead-scoring approaches.
The lead score field is available in list views, reports, dashboards, and lead detail pages. On detail pages, the lead score appears in the Einstein component. The component also shows sales reps which lead fields have the greatest positive (1) or negative (2) influence on its score. 


Lead Insights - Lead Insights periodically reanalyzes your historical leads and updates the scores for your current leads accordingly.
The Lead Insights Dashboard includes reports that show key lead score metrics for your org.
  • Average Lead Score by Lead Source
  • Conversion Rate by Lead Score
  • Lead Score Distribution: Converted and Lost Opportunities
Opportunity Insights - Einstein users get predictions about which deals are likely to be won, reminders to follow up, and notifications when key moments in a deal take place. Sales reps can see all the insights related to their deals on the Home page, Opportunity record and in list view. The Home page also features relevant actions related to different opportunities, such as the ability to edit an opportunity’s close date or email a contact who hasn’t responded to a request.

Opportunity record will look like as below


Different types of insights are available.
  • Deal Predictions—See predictions based on recent activity and existing opportunity data, such as whether a deal is more or less likely to close, or if a deal seems unlikely to close in time.
  • Follow-Up Reminders—Get reminders to follow up when a contact hasn’t responded in a while, or if there hasn’t been any communication related to an important opportunity for a significant period of time.
  • Key Moments—Get notified when key moments related to a deal take place, such as when a contact mentions a competitor or is leaving their company.
Account Insights - Team stays informed about key business developments that affect their customers. Insights appear in the Einstein component on account records and the Home page.
On the Home page, Einstein users see insights based on the accounts they own and the accounts of which they’re an account team member. A user’s manager also has access to these insights. Each insight shows up to three of the most relevant articles. Users can email insights to others or share them with users and groups through Chatter.

Refer salesforce for more detail

https://www.salesforce.com/in/products/einstein/overview/

Please refer Spring 17 release notes from HERE

I will cover following topics in next post. Stay connected
Salesforce Batch Job
Salesforce agile methodology benefits and drawbacks
Salesforce Interview Questions- http://salesforcecodelearn.blogspot.in/2017/02/salesforce-interview-questions.html