Quip is the next-generation productivity suite that combines documents, spreadsheets, task lists, and team chat in one seamless experience known as a living document. Quip is 100% cloud based, and built for both your desktop and mobile device so you can work with your team the way you want to.
Quip is built to help every team in your business — sales, service, marketing, product, IT, and more — work smarter, collaborate more effectively, and increase their productivity. With Quip Connect, you can open Salesforce reports in Quip with Live Data. You can also search, access, and share Quip content right inside Salesforce.
Salesforce has launched an AppExchange package called Quip Connect for Salesforce
so users can export reports from Salesforce’s Sales and Service Cloud and even open up Quip-powered documents natively within the CRM.
This tool is free. You can download it from App exchange. Once installed, we can see package from installed packages.

We can create quip account from https://quip.com.
With Quip Connect, you can open Salesforce reports in Quip with Live Data. You can also search, access, and share Quip content right inside Salesforce.


Use the “Live Data” button to change data settings, open the report in Salesforce or view the report owner.
 We can do formatting of the extracted report from Format tab. From insert tab we can insert row/column.
To link quip documents to Accounts, opportunities, or contact. Open account then go to Quip Documents section. Search document created in quip and click on link.

Please find Quip Connect documents from App Exchange
Quip is built to help every team in your business — sales, service, marketing, product, IT, and more — work smarter, collaborate more effectively, and increase their productivity. With Quip Connect, you can open Salesforce reports in Quip with Live Data. You can also search, access, and share Quip content right inside Salesforce.
Salesforce has launched an AppExchange package called Quip Connect for Salesforce
so users can export reports from Salesforce’s Sales and Service Cloud and even open up Quip-powered documents natively within the CRM.
This tool is free. You can download it from App exchange. Once installed, we can see package from installed packages.
We can create quip account from https://quip.com.
With Quip Connect, you can open Salesforce reports in Quip with Live Data. You can also search, access, and share Quip content right inside Salesforce.
Set up Quip Connect with Lighting
- In an Account page, click the gear (upper right) and then click “Edit Page.”
- Next select the right-most rectangle (containing Activity and Chatter tabs). Then click on the tabs themselves (Activity & Chatter).
- Add the custom tab called “Quip Documents.”

4. Search for Quip in the “Lightning Components” search (to the left of the page).
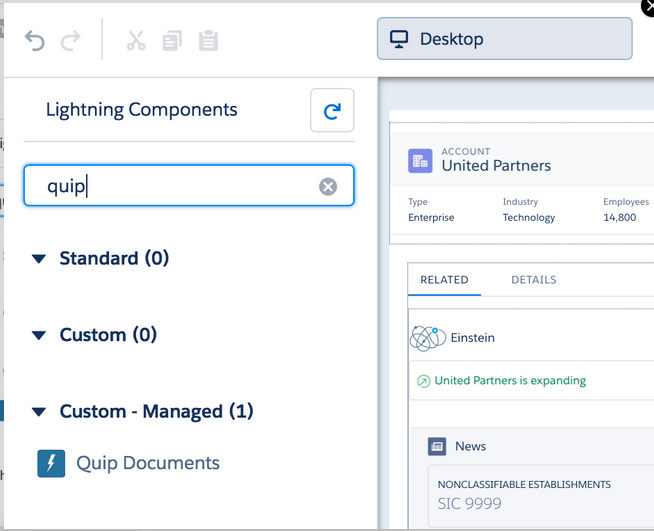
5. Drag the Quip component into the “Quip Documents” tab you created in Step 3.
6. Click “Save” in the upper right-hand corner. Then click “Back,” also in the upper right-hand corner.
Set up Quip Connect with Salesforce Classic
Go to Account ->page layout->click edit button.
Add new section and drag quip_comp_accounts from visalforce page.

To open a salesforce report in Quip
click open reports in quip tab and select report. Click on Open in Quip button.
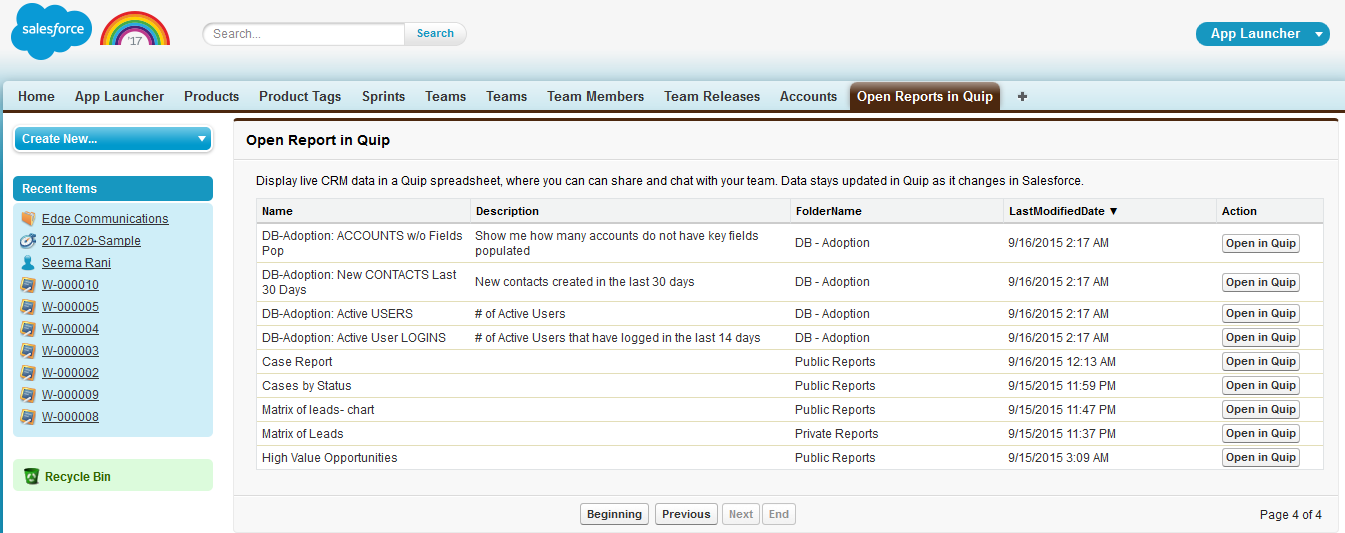

Use the “Live Data” button to change data settings, open the report in Salesforce or view the report owner.

To link quip documents to Accounts, opportunities, or contact. Open account then go to Quip Documents section. Search document created in quip and click on link.

Please find Quip Connect documents from App Exchange
The Blog gave me idea about the salesforce thanks for sharing this post and please continue to share this kind of post.....
ReplyDeleteonline form builder for salesforce
Many thanks for comments. I am glad that you liked it.
DeleteThis is my first time visit here. From the tons of comments on your articles,I guess I am not only one having all the enjoyment right here! salesforce
ReplyDeleteThis is an awesome post.Really very informative and creative contents. These concept is a good way to enhance the knowledge.I like it and help me to development very well.Thank you for this brief explanation and very nice information.Well, got a good knowledge.
ReplyDeleteBest quoting software