Sunday, 20 October 2019

Learn Salesforce from Beginning - Salesforce Lightning Part 3

In todayʻs post we will learn about Salesforce lightning and its key features. 

lightning platform provides new interface which can be used to increase our productivity. It provides out of the box tools and services to automate business process , integrate with external applications, provide responsive layouts and so many other features. With the help of lightning experience, we can build applications with no code.

Please find below video which explains in detail.

Learn about enabling custom domain from this post.

Learn about roll out strategy from this post


Sunday, 22 September 2019

Learn Salesforce from Beginning Salesforce Data Model- Part 2

Salesforce Data Model

In todayʻs post, we will learn about Sales Cloud features and data model.

Sales Cloud

Manage contacts and track opportunities from any desktop or device with  the world’s #1 CRM solution. Grow your accounts faster, find new customers faster, and close deals faster — from anywhere.
Few key Features
    •         Account and Contact Management
    •         Opportunity Management
    •         Lead Management
    •         Reports and Dashboard

Account and Contact Management

Few key Features

    • 360 degree view of customer details
    •  Activity history
    •  Key contacts
    • Opportunity details
    • Customer communications
    • Internal account discussions
    • Store Customers information

Opportunity Management 


    • Complete view of your team’s deals with Opportunity Management.
    • See stage, products, competition, quotes, and more.
    • Stay connected to the people and information you need to close every sale.
    • Close Deals.

Lead Management


    •        Track your leads from click to close, while continually optimizing your campaigns across  every channel. 
    •         Make smarter decisions about where to invest your money.
    •         Automate Lead Management
    •         Capture leads from different sources like Email, Website, trade shows


 We do have Standard objects available in Salesforce. It allow us to create custom object as well.


  •  Account :- This is the main object in Salesforce. We Store partners and our customer information in this object.
  • Contact :- Store Employee details of our customers. This has parent- child relationship with Account.
  • Opportunities :- Track and manage potential deals.
  • Campaign :-Manage and track marketing campaigns which we run to promote our product. 
  • Lead  :- Prospect to whom we can sell our product.
  • Solution :- Keep prefined solutions of the issues generally customer faces
  • User :- Individual who works in our company
  • Case :- Log complaints raised by customers
  • Quote :- Represents the proposed price of the product.
  • Orders :- Use to track customerʻs request for product and services.
  • Products :- Use to keep items and services which we sell to customers.
  • Price Book :- Refer to price of the product and services we sell to customers.


 You can sign up for free developer edition from here. We can look into all standard objects, their relationships from developer editions.


 We will learn about Custom objects in next post.

Saturday, 21 September 2019

Learn Salesforce from Beginning- Part 1

Today, I am going to start writing a new series for students, professionals who are new to Salesforce and want to learn it from scratch. I will share all my experience which i gained in last 14 years.

Salesforce Introduction

Salesforce.com, Inc. is an American cloud-based software company headquartered in San Francisco, California. This company is founded by Marc Benioff and Parker Harris in 1999. Salesforce is Customer Relationship Management solution which helps companies to provide solutions for all customer needs. It provides a platform which allows all your departments including Sales, Purchase, Marketing, IT work together to achieve the target. They can have 360 degree view of all customer details. 

Salesforce provides a new way to run your business. By using Salesforce Mobile App your executives run the business from anywhere. They can take important decisions on mobile while travelling to office. Salesforce provides lots of out of box features which you can use to run your business.

Key Benefits

  1. Generate leads and create opportunities to bring new business
  2. Help customers in resolving their day to day issues with the help of Case Management.
  3. Set up communities for customer engagement
  4. Connect with coworkers with Chatter. 
  5. Marketing Cloud to manage customer journey

Architecture


Salesforce is based on multi-tenant architecture which can be compare with big building. The building has many floors and each floor has multiple flats. All the people living in different flats in this society shares resources like water, electricity, power backup. In the similar manner, Salesforce provides core set of services to their customers and customers can trust on Salesforce for keeping their data secure. Also, you will get the latest features, upgrades automatically three times in a year. You do not need to install any software on your machine to start working on it. Only you need username to work on Salesforce. Rest everything is taken care by Salesforce.


Salesforce Ecosystem

Salesforce has largest community more than 10 millions worldwide.
Salesforce has free learning tool Trailhead.
AppExchange - We can install pre-built applications developed by Salesforce partners in our orgs. These offerings are available ( free/paid)

Salesforce offers different products. Depending on our business need, we can buy licences from Salesforce.
  1. Sales Cloud
  2. Service Cloud
  3. Marketing Cloud
  4. Commerce Cloud
  5. Community Cloud
  6. Einstein Analytics
  7. Mulesoft


In next post, we will learn Salesforce data model, metadata and features.

Sunday, 15 September 2019

Key Lightning Features in Winterʻ20 - Part 2

1. Access Recycle Bin in Lightning experience

We can access Recycle bin in lightning. We can delete my or organizationʻs records permanently. At the same time we can restore back records in org. This was much needed feature. Earlier we need to navigate back to classic to access Recycle bin.

The org’s Recycle Bin is called Org Recycle Bin (1). The classic name is All Recyle Bin.


Restore records by clicking Restore (2) instead of Undelete in Salesforce Classic.


Permanently delete records by selecting them and clicking Delete (3) versus Undelete or Empty in Salesforce Classic.


You can’t restore reports and dashboards. Switch to Salesforce Classic to access them in the Recycle Bin.


2. Turn on Lightning Experience

Salesforce is turning lightning experience on a rolling basis in Winterʻ20. All orgs will receive in-app prompts with recommended action to take before the critical update.

We can use Lightning Experience Transition Assistant for step-by-step guidance and tools.

We can also get answers of our lightning related questions from ohana using chatter group Lightning Now

3. Lightning experience Configuration converter

We can streamline and automate common transition tasks using Lightning experience configuration converter.

Refer Release document

4. Salesforce Mobile App

Admin can create mobile experience for their users which will ease their tasks. Salesforce users will get unified experience working across mobile and desktop. Refer Release Document.

Saturday, 14 September 2019

My favorite Opportunity features in Winterʻ20 - Part1

  1. Sort Products on Opportunities

Now, we can sort products on opportunity related list. earlier products used to display in the order they appear. Sort order of the products will get updated during sync if related opportunity or quote record get updated.


Screen 1

 Earlier this features was available in classic only. Refer screen 2.

Screen 2

2.  Add Products faster in Opportunities in lightning

Reps can add products in less time with the use of dependent picklist as they create opportunity. They do not need to visit individual opportunity to complete fields. Sales Reps can edit the fields if they are using dependent picklists in the multiline editor for opportunity products. Previously, dependent picklist fields were read-only. Refer Screen 3

Screen 3

3. View Teamʻs Opportunities with one click

Sales managers can view their teamʻs opportunities with new list view "My teamʻs opportunities" which is based on role hierarchy. 

On the Opportunities page, click the filter icon for filtering a list view, and then Filter by Owner. Then select My team’s opportunities. Click Done. Refer Screen 4


Screen 4

Refer Winterʻ20 Release notes from here.
Winterʻ20 Sandbox preview details can be checked from here.


Saturday, 13 July 2019

Lightning Email Template

We can setup Lightning email template to standardize the email sent to contacts, leads, person accounts from Salesforce. Once the email template is created, we can use it any number of times.

In below example, we will send email to Opportunityʻs contact.

Steps to create email template:-

  • Go to the object which offers email functionality. We will navigate to opportunity tab from Sales application. 
  • Click on Activity tab and then email.
  • Select any object from Related To field. Depending on object you select, fields will be available. We will select Account in our case.
  • You can use existing email template or write your own email content to send an email.
  •  Click on insert merge field to select field.


  •  Click on Save as new template to save email content.


  •    Click on send email button to send it.
  •    You can view sent email in Past Activities section.


  • You can use this template to send email to any other contacts in Salesforce.
  • We will send email to any other Accountʻs contact to discuss Opportunity progress. Navigate to any other opportunity and click on Activity.
  • Click on template and select recently used template.. 


  • Template will get copied here and click on send button to send email.

Permissions:- 

Lightning email templates are stored in private directory by default. If you have the Manage Public Lightning Email Templates permission, you can also create, edit, and delete public templates.

Step by step information to create email template can be viewed from video.

Reference link.

Friday, 28 June 2019

Row Level Formulas- Summerʻ19 Feature

With this release, we get an option to create row level formulas (Beta) in Lightning reports. Sometimes, we want to show some calculated data in reports which is possible with the help of formulas. Currently, we can create maximum 1 row level formula in reports.

First, you need to enable setting.

Setup-> Reports & Dashboard Settings-> Select checkbox for Enable Row-Level Formulas (Lightning Experience Only)


Now, its time to add formula in report. My requirement is as follows:-

I want to see number of days left in closing opportunity. If opportunity already closed or close date was in past then i will show zero in formula. I will modify existing opportunity report to add formula.

Go to the column panel and click on "Add row level formula Beta".


Add formula as shown in below image.


Click on Run button. You will see output. In below report, we can see number of opportunities by each rep and days left in closing the opportunity.


Step by step information to setup row level formula can be watched from this video.

Reference URL -
https://admin.salesforce.com/get-buildspiration-with-summer-19-row-level-formulas
https://releasenotes.docs.salesforce.com/en-us/summer19/release-notes/rn_rd_reports_row_level_formulas.htm

Wednesday, 19 June 2019

In-App Guidance - Summerʻ19 feature

We can create in-app guidance in salesforce to engage with our users, to give training to them. We can create action buttons to navigate  them to important URLs. We can specify audience and duration.

You can add up to 500 prompts per org. This limit doesn’t include prompts installed from packages. You can add multiple prompts to the same page, but multiple prompts don’t appear at once.

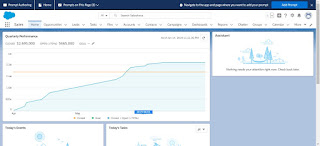
In this example, we will setup in-app guidance for our users to train them on Custom notification. We will setup prompt on homepage in Salesforce org to navigate them to my blog post.

Steps to configure in-app guidance are below:-

1. Go to setup -> quick search ->search for in-app guidance.


2. Click on Add prompt. You will see Open Prompt Authoring Bar screen. You can create and edit prompt using this screen.
3. Navigate to the Application and then tab where you want to display prompt. Click on Add Prompt.


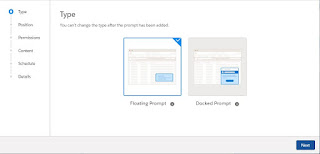
4. You can select the prompt type either Floating or Docked. We will select Floating here.
5. Click on next to select position. We can select location as top or bottom left, center, right.

6.  We can setup permissions to give access to everyone or to users with specific permissions can view it.


7. From the content tab, enter title and body. You can add buttons.

Choose to have an informational prompt with a dismiss button only or add a specific call to action. The dismiss button closes the prompt. The optional action button opens a URL. Add Action button, if you want to navigate to external URL.

8. We can Choose a date range for the prompt to appear. Then, decide if the prompt should appear once or repeat.
9. Enter the details of the prompt. 
10. Navigate to Application and click on Home tab. You will find prompt with custom notification. Click on custom button Learn. It will navigate to blog link.


Click on open button. It will open blog post. Your users/reps can learn about custom notifications from there.

Please follow video with step by step information to configure.

Reference link:- 

Tuesday, 18 June 2019

Custom Notification - Summerʻ19 Feature

We can send custom notification whenever any important event occurs. Example, you can notify Account owner to followup with client whenever any opportunity closes or you can notify sales manager when opportunity wins.

Previously, you could send only standard notifications for use cases predefined by Salesforce. Notification Builder puts you in control of who needs to know what and when.

Step 1 ) First we will setup Notification. To do so follow below steps:-

Setup -> quick search -> search for Notification Builder -> Click on Notification types.

Enter Custom Notification Name and supported channels. Refer below screenshots.


Step 2) Create new process using process builder to send notification.


 Process Name :- Notify Account Manager whenever opportunity wins
Object - Opportunity
Start the process - when a record is created or edited
Set condition as Opportunity stage = closed won.


Step 3 ) Select Action type as Send Custom Notification
Action Name - Notify Account Owner
Notification Type - Notify Account Manager whenever Opportunity wins.
Notification recipient -> Recipient could be User, Owner, Group, Queue and Account team.
In this example we will select Account owner.

Enter Notification Title and Body.

Save the process and Activate it.

Step 4) Navigate to Sales Application -> Close opportunity.

Login as Account owner. Click on Notifications next to setup link on available on right top of screen. You can see custom notifications.

Please follow my video to get step by step information. 

Reference link:- 1) https://admin.salesforce.com/get-buildspiration-with-summer-19-notification-builder
2) https://releasenotes.docs.salesforce.com/en-us/summer19/release-notes/rn_mobile_s1_newfeat_notification_builder.htm

Monday, 17 June 2019

Related List Filter - Summerʻ19 Feature

Summerʻ19 comes up with lots of new feature. We can put quick filter on Related list. Use quick filters in your related lists to find the data that you’re looking for. Related list quick filters are different from regular list view filters in that they aren’t saved, persist only throughout your current session, and can’t be shared.
First step is to enable Enhanced Profile User Interface. Follow steps mentioned at link to enable it.
Its time to test quick filter on Related List. Go to App Launcher -> Navigate Sales Application.

Open any account and click on Opportunities related list and click on View All.

Click on filter link. You can put filter on all the fields specified in list view and click on Apply button and you will get required result.

Please find step by step information in below video to use quick filter in Related List.

Related List quick Filter

Sunday, 16 June 2019

Enhanced Related List

Summerʻ19 comes up with many new features including Enhanced Related List. 

With Enhanced Related Lists, you can show up to 10 columns, resize and sort your columns, perform mass actions, and wrap text.

We can display maximum 10 fields on related list record. Default ordering is by RecordID. We can sort by any number of field on the object level.

To modify page layout, follow below path:-
Setup-> Object Manager -> Click on object -> page layouts. Click on edit link. 
Go to related list and click on wrench icon and select 10 fields which you want to display. 


Select the field name in sort by column.


To display more than four fields in Lightning Experience, edit the related list component in the Lightning App Builder and choose Enhanced List as the related list type. Follow below steps:-

Open Account record -> Click on edit page from setup.
Go to related list section and select Related list type as Enhanced List. We can specify number of field to be displayed. Maximum number is 10.


Open Account record and on opportunity related list, you can see 10 fields.


Wrap/Clip Text

Go to related list tab and navigate to object whose text you want to wrap. 
Below Video contains step by step information to configure enhanced related list.

Reference link:-


Thursday, 13 June 2019

Celebrate Sales Success using Path

Path

We can celebrate success in Salesforce using path. Now, your reps can have fun along with work.

Path is only available in Lightning.


Path is available for the following objects in Lightning Experience:

  • Accounts (Business Accounts and Person Accounts)
  • Campaigns
  • Cases
  • Contacts
  • Contracts
  • Leads
  • Opportunities
  • Orders
  • Quotes
  • Service Appointments
  • Work Orders
  • Work Order Line Items
  • Custom Objects


Path is also available for leads and opportunities in all versions of the Salesforce app.

Enable path:-

Go to setup -> search Path Settings in quick find. Select Enable Path checkbox.
Click on New Path and select object and Recordtype for which you want to setup Path.


From the picklist option, you can select any available picklist field for that object.

Here we are creating path for Opportunity object and Stage picklist. 

In Step2 , you can Select Fields and Provide Guidance for Each Step in the Path


In Step3, Set status as Active. Select option B.

Activate your path. If you aren’t ready to make this path available now, you can still save it and activate it later.


Select Confetti to celebrate particular status. To do so select option A.

A. When users reach a specific step in the path, help them celebrate their success with on-screen confetti. Here we are selecting status as Closed Won. 


After setting up path, create opportunity and update stage to Closed won.

You will see celebration on desktop.

Video link is below:-
https://youtu.be/jck2t2TpEbY